
How to Inexpensively Start a New Podcast: Exporting and Distribution
In this third and final installment of this beginner’s podcast guide, I’m going to be discussing the final parts in starting your podcast: exporting and distribution. Of course, if you’re new to podcasting and are wondering what the other installments are about, you can find them here (Equipment and Software) and here (Planning and Production).
Also, just a reminder, we’re loosely using Pat Flynn’s 2012 video tutorial as the backbone of this tutorial. However, we’re focusing more on doing it for less than what Pat recommended at the time.
So let’s get started…
Let’s start with Pat’s video in where he shows how to export your podcast in Garageband:
Logic User Differences:
Again, I’m not sure if Pat still has his team use Garageband to produce the SPI podcast or not, but I do know that if you’re an audiophile – you’re probably using something a little more professional.
If you want to go the more professional route right out of the gate, Logic is a good choice. You’ll have to pay for it ($200 at the Apple Store), but you’ll definitely learn a lot more along the way about production – if you want to.
Again, Chase talks about them in his tutorial on Fizzle.co (that’s a link for free trial to Fizzle) because he uses Logic to produce the Fizzle Show.
But to save you some time, here’s the export settings that you’ll want to configure Logic to export or “bounce” your project to:
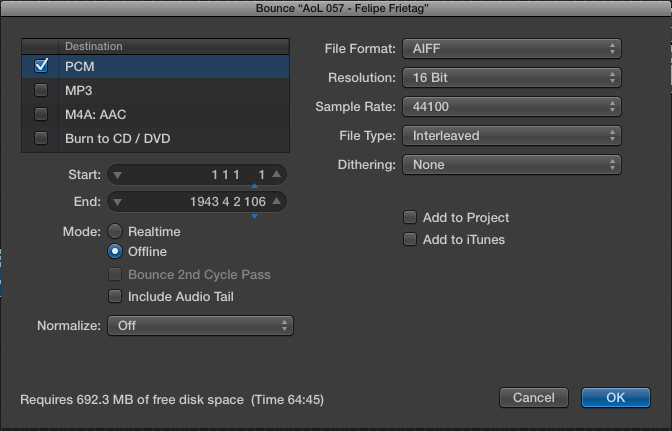
My Logic X Bounce Options
Now, when you do this, you’re going to have a rather large file still as you’re publishing to a raw audio format. Most podcasts are in mp3 format.
“Why not go with mp3 here?”, you ask.
Well, you could and I’m sure many people do. But in Chase’s video he explains that your audio is more than likely going to be in stereo if you export directly from here.
There’s nothing wrong with that if you like to have your audience feel like one person is on the left and another person is on the right and so on.
Like Chase, I prefer to have the audio in mono because it shrinks the file size of the final file by half.
Here are the settings that I use in Compressor ($50 via Apple) to shrink my show to small files (because it’s mono) but still reasonably good quality audio:
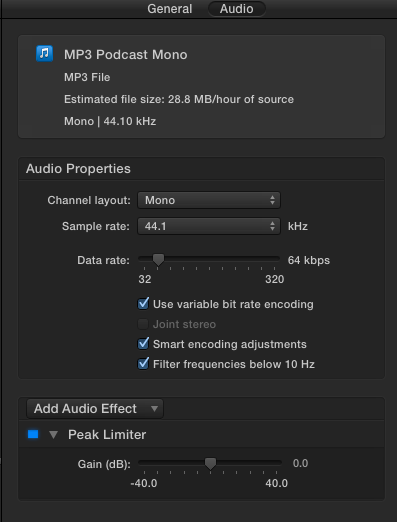
The settings I have for Compressor
You should know that Compressor is typically used for video files (specifically Final Cut Pro files) but you don’t have to have Final Cut for it to work.
Normalizing and The Levelator:
One of the things that Pat mentioned in his tutorial that he used to do is use the Levelator to bring all his voices and sounds to the same volume level.
It’s a great simple solution.
However, if your show is designed to have manual fade-ins and fade-outs, or you purposely alter the volume to censor cusses, or anything that changes the volume, then using the Levelator is not going to be your best choice. It will basically destroy all those fine tunings.
This has been my case.
I use Fade-ins and outs to transition from one part of the show to another. The Levelator destroys those transitions.
So for the longest time I’ve been struggling with making sure that everyone sounds good on multiple speakers. In my office, many of my shows sound great, but when I got them to my car which has a much different setting than my office, my side of the conversation would sound much fainter.
I think I’ve fixed that as of session 59. Per Chase’s advice via the Fizzle forums and Podcast Master Cody Boyce’s help, I’ve started altering the output level of the entire track. Hopefully this will be a welcome chance to those of you who listen in your cars as well as your headphones.
After Exporting but before Distribution
Tagging:
Ok, so getting back on track here. The next thing that Pat talked about was tagging your new mp3 file. (We’re at the 15:13 mark in the first video in the process if you’re wondering where we’re at.)
Only thing I’ll say here is that Macs have it easy because you can do it in iTunes. However, if you don’t want to get iTunes on your PC, you can use Mp3tag to do it. It’s free, but if you use it quite often, you might want to consider a donation. 🙂
Here are the tags that I use for my show (depending on who my cohosts are):
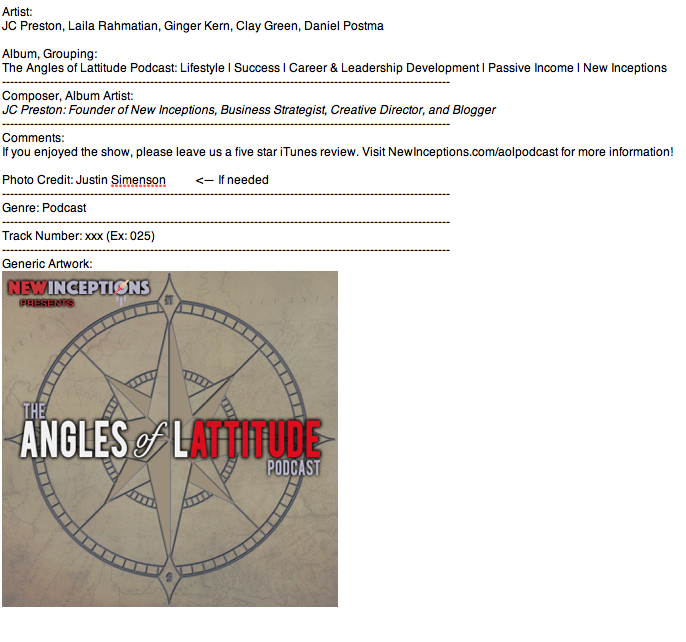
Tags for the Angles of Lattitude Podcast
Artwork:
You probably noticed that as part of my tags, I have my “generic artwork”. Artwork is huge. You can’t forget it – and unfortunately, many podcasters do.
You want to make sure that you have some sort of generic piece that you’ll be able to post on all of your shows.
Feel free to make personal cover art for your guests!
Pat used and continues to use one piece of artwork for his podcast. If he’s changed it since then, it wasn’t much.
That said, I change mine every show based on who I’m talking to. I give each one of my guests their own individual “cover art”. And when you have a template going like I do, it doesn’t take too much longer to add this personal touch.
The artwork that is in the tags is usually what the player will play in your listener’s player – unless it uses the generic artwork provided to the place where people are downloading your show from.
I know that you can’t change Stitcher and Google Play’s artwork as they overlay the generic artwork that you’ve chosen to register with them. On the other hand, iTunes, SoundCloud, and any player that actually downloads the file to your listening device, will more than likely use the artwork you provide for that particular file.
So my recommendation is definitely have a generic artwork image that you use per show. But if you have an interview based show, feel free to give your guests a little more appreciation by giving them their own cover image!
Distribution:
Ok, now we want to get our podcast into the world. How do we do that? The best way to do it is to use a remote host to do the work for us. Pat will explain this in detail here:
Through my experience, Libsyn is a great option for all the reasons Pat mentioned.
Another thing to note is Libsyn is set up in a way that you can upload it at one point and then it will become available whenever it is published. Before it is published, you get a link for where it will be linked from.
This means that you can get all your show notes all ready to go before the actual launch of that particular show. Essentially you can set it to go off and then work on getting your marketing ready to go.
This is a great thing.
However, the more bang I can get for my buck, the more I’ll want to use a particular option. For Chase and I, we both use SoundCloud as the host for our show.
And while we can’t actually set it up before hand like Libsyn (SoundCloud only gives their file link after it’s published – and even then you have to look for it in Settings > Content. Then copying and pasting the rss feed URL to another tab and then searching for “URL=” in that page of code to find your files. Ugh.), all the metrics that comes with Libsyn’s middle pricing tier is available through the basic tier of SoundCloud.
So, I’ll say this. If getting your content ready to go ahead of time is priority and you don’t do things at the last minute like Chase and myself, then you’ll want to definitely go with libsyn. If you just want to go the least expensive route – SoundCloud is currently the way to go.
That said, everything else as far as setting up Blubrry hasn’t changed – so I’ll leave Pat’s last video here:
Action Steps:
Alright, guys. There you have it. That’s the basics of how I do my podcasts. Again, mad kudos to Pat and Chase for their help in teaching me this process.
Now it’s time to start your own show.
I hope this gives you a little more insight into the behind the scenes of doing a show so you can start yours or make your current process a bit more efficient and/or easier on the wallet.
If you have any questions regarding this process, feel free to contact me using the contact page. I’d be glad to help you out in any way I can!

Leave a Reply
Want to join the discussion?Feel free to contribute!